A Modern Sewing Blog.

Friday, September 27, 2013

How To Alter a T-shirt

How many huge boxy men's or unisex t-shirts do you have stuffed in drawers at home? So many, and some of them are from events and things we'd like promote or remember. Well, never fear the t-shirt tutorial is here! It is so incredibly easy to change the shape and size of a t-shirt, the first time I did it I nearly fainted in front of my mirror in glee, this opens up so many more nerdy shirts for me. I hope these pictures and directions give you the courage and knowledge you need to no longer relegating those 5k and volunteer shirts to your pajama drawer.

What you'll need:
A t-shirt that fits you well (to use as a template)
ball point sewing needle
matching thread
My son is in love with this local restaurant/shop, Station 66, (as am I) and has been bugging us for a t-shirt from there for a while. His birthday is saturday and I wanted to get him one as a gift, but alas their shirts are only in adult sizes. Very basic sewing skills to the rescue! I bought an adult small and am using a shirt of his (size 6) that I know works well.


Step 1:
Turn your huge shirt inside out and lay it on a flat surface being careful to smooth out all the wrinkles and line up all the seams

Step 2:
Take the shirt that fits you well and lay it on top of the t-shirt you want to change. Make sure the shoulders are lined up and everything is smooth (really take your time on this step you don't want to accidentally alter your shirt crooked) Pin through all the layers in a few places to keep it from slipping.


Step 3:
Trace around the sides and up along the bottom of the sleeve of your well fitting shirt. As you trace along the bottom of the sleeve extend your chalk line to the edge of your shirt. If your going to want to hem your new shirt be sure to leave an inch or so beyond the bottom of the well fitting shirt to fold in. Don't trace around the top of your shirt this will be left alone (In other words we won't be altering the original shoulders or necklines).

Step 4:
Carefully remove the well fitting top shirt. Your working with knit fabric here so remember to change you sewing machine needle to a ball point needle. No Sew right along the lines you've marked, straight up the side. Pivoting at the armpit and continuing where you marked the bottom of the sleeve. Do the same thing on the other side.
here you can see the new lines. 


I'm sewing right on the chalk lines
Step 5:
Cut away the access fabric along your new seams (I like to leave about 1/4 to 1/5 inch of fabric. Knit doesn't unravel so don't worry about the raw edges. Cut the sleeve back to your desired length (you can hem the sleeve but I find it's a bit tricky with the knit and since it won't unravel I simply make sure it's a nice clean cut and leave it at that.)

Step 6:
Go back and reinforce the stitching in the underarm.

Step 7:
Cut the shirt to it's desired length. If you want to hem the bottom now's the time. Turn in the raw edge about one inch, iron and sew a new hem. I like to sew two lines of stitching along the hem; the first 1/4 inch from the fold and the second 1/4 inch away from the first row of stitching. I find this gives it a pretty professional look.

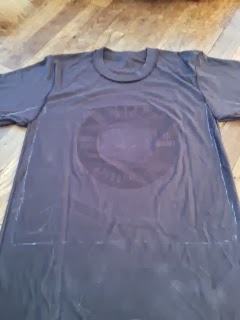
Here's the finished Station 66 shirt next to a regular t-shirt of his. I think it looks pretty good. And, usually when your doing this kind of alteration it won't be as extreme of a size shift so it'll look even better.


If you have any questions leave them in the comments. I read every comment we get. So if there is any step that your unsure about ask away. Also don't forget to check out our first "Sewing Room Tour" and we're pinning away like mad on Pinterest.

Now go and take that shapeless sports shirt and give it some girly shape!
Happy Sewing
Love, Jessie.

Sunday, September 22, 2013

Welcome to My Sewing Room,

These shelves are something I'd like to improve on.
Please come in and make yourself comfortable. This post will be short on words and big on gorgeous photos of my favorite room in my house! Yes, I'm lucky enough to have an entire room for my sewing something I am very grateful for. And while there are things about it I'd like to improve (there are no pictures of the closet!! And I'd love french doors to an outdoor patio.) I am amazed at how much more creative I am and how much more I'm able to get done with a dedicated space.

Here it is I'll let the pictures do the talking. And a HUGE thank you to Bethany Clay for taking these photos for me. She has such a great eye and these pictures are so beautiful.


One thing I really wanted in my sewing room was a bed for
my best sewing companion, though he prefers to lay on scraps of fabric.

The pincushion was made out of a tin can by my great grandmother
and those scissors belonged to my other great grandma.

Halloween Costume in progress

Oh Janome what would I do without you?

I love old suitcases and they serve as a great place to store my
vintage patterns.


This peg rack was made by my papa.
I always know where my scissors are...
usually...

I hope you enjoyed our first "Sewing Space Tour" and I hope you'll come again.
Happy Sewing

Friday, September 20, 2013

Still Here.

I did not forget you dear readers! This week was a perfect storm of out-of-town visitors and really confusing technical difficulties. I hope you can forgive me! The first sewing room tour will be up soon (hopefully by the end of the weekend) I have a sweet friend coming over Saturday to help me sort out the computer difficulties I'm having with the photo files (the dark side of the awesomeness of working and blogging online). So keep on the lookout for that.

In the meantime I had to announce the winner of the owl pincushion pattern and give you the what's what on the new class schedule for the shop! The winner of the owl pincushion is.....

SUNSHINE RANDALL!! Congratulations! Send us a facebook message with your address and I'll put the pattern in the mail unless you'd rather pick it up in the store. Just let me know.

Now for the updated class schedule:
Alpine Wonder: Wed Dec 11, 10am-2pm and Fri Dec 13 10-2pm
Bali Pop Basket Fri Oc 11 10-2pm Sat Oct 19 10-2pm
Crabapple Hill Club First Tuesday of the month 2pm
Hippy Hippy Shake Sat Nov 9 11-2pm Sat nov 16 10-2pm
Judy Neimeyer Club Third Tuesday of the month10-1pm
Lazy Daisy Wed Dec 4 10-2pm
Machine Embroidery Halloween Wall Hanging Sat Oct 5 10-2pm
Modern Holiday Club Wed Oct 16, Nov 20, Dec 18 2-5pm
Mondo Bag Oct 10 and Oct 17 11-1pm
Pincushion Club Last Monday of the month 10-12pm
Spice Market Tote Nov 14 10-2pm
The Art of Elegant Hand Embroidery First Friday of the month 2-5pm
Twisty Twirly Scarf Nov 13 2pm
Wool Club. Third Thursday of the month 2-5pm


There are lots more details about each class on the website. Click the class your interested in to see the details.

Now if there isn't a class here for all the sewing enthusiasts, then I'll eat my hat. Preferably one I made myself out of real felt! Hopefully I'll see you at some of these classes and we'll get to know each other whilst learning from the best (our own Sue)!

Saturday, September 14, 2013

Just Checking in.

You would not believe how clean my sewing room is! I don't even want to sew it's so clean and organized. Under all those scraps of fabric and bits of thread was a real beauty. One of my dear friends came and took pictures on her fancy camera of my sewing room for a new segment we're going to start here on the blog called "Sewing Spaces" where we'll take a virtual tour of a room or corner of a room that has been set aside for creative pursuits. Look for that soon. To go along with our "Sewing Spaces" segment we've started a Sewing Spaces Board on Pinterest. Click Here to check out lots of beautiful spaces and ideas for decorating and organization your own sewing places. While we're on the subject of connecting with us I wanted to point out that If you look to the left of this post you'll see a column titled "Connect with us here" click any of those links to find our website, Facebook, or Pinterest account where we're always pinning inspiring creative ideas.

Don't forget to leave a comment on the last blog post to be entered to win the Owl sewing pattern from Sewn into the Fabric. Click Here to read that post.

New classes starting in the shop. It's the perfect time of year to commit to a new project and hang out with awesome sewing ladies.

Lastly, I wanted to introduce you to our Sewing Song List. I don't know about you but I have to have some sort of music going in the background whilst I sew. I thought it'd be fun to share what we listen to while we create. I'll try and post a new song list each week for you to enjoy as well. This week I'm needing something classic but upbeat to give me the energy I need to do a lot of work fast and well. Sort of a swing feel to keep me planning that cute 1940's inspired pencil skirt I want to sew. And a bit of an homage to my dear sisters who I'm missing immensely right now. I hope you enjoy.
Happy Sewing
Love Jessie.

Thursday, September 12, 2013

A Parliament of Owls.

Apparently a group of owls is called a parliament. I just love that don't you?! If only lawmakers were as  cute as this group of little owls, they're certainly wise as they sit upon your sewing desk holding your pins. It seems as if they have all the answers to your sewing conundrums, or at least they imbue a sense of humor to all that you sew!

Owls are all the rage right now and these cuties are small (about the size of a large spool of thread), and very easy to whip up. You could make an entire parliament for your friends with very little time (something that's much appreciated this time of year). The pattern says they're pincushions, and what cute ones they are, but they could just as easily be small stuffed toys for children (age appropriate of course because I think they could be a choking hazard), or Christmas ornaments. Just sew a ribbon loop on the top and you've got the perfect stocking stuffer or package trimming.
What a cute bunch of moda owls! 

A few notes: I mostly used fabric from a Moda Bundle I bought in the shop along with a few vintagy fabrics from my stash. The first few I made looked, well, odd to say the least. If I was being honest I'd say they looked drugged (my husband thought the first owl I made looked like a mad scientist)! I couldn't figure it out until I realized that I had used white buttons as the pupils instead of black! Once I corrected that mistake they looked cute as ever.
I filled mine with corn because I was too lazy to go to the pet store
for crushed walnut shells like they suggested. As you can see my owls
may have substance abuse problems. It's fast if you make a bunch
factory style.

The pattern instructs you to sew the buttons together first and then sew them to the owl. That was a bit fiddly for me and I liked the way the buttons look when you put the black ones off center from the white, I think it makes the owls look amused (which is an idea I got from Ramona Quimby Age 6). So I got out my trusty glue gun and glued the buttons together and glued them to the owls. It worked great for me and was way faster.

I also liked the way the owls look without the yarn. In fact I couldn't decide which I liked better. My husband reads this cute comic to the kids about a lovable owl who enjoys gardening, and I thought without the yarn looked much more like Owly, so I made them both ways.

If your wanting to make your own owls you can pick up a pattern in our shop or you can order it at our online store AND if you leave a comment on this post answering the question: "who or what inspires you to sew the most" you will be entered to win an owl pattern for FREE. We'll mail it anywhere so even if your not local enter (on this blog not on Facebook)! We'll randomly pick a winner Monday!
A picture of the pattern you can buy it at
our online shop or win a copy!.
Happy Sewing,
Love Jessie.

Sunday, September 8, 2013

Quilt Show 2013


So I am back from my first ever quilt show and let me tell you it was an experience! I've always known that people love quilts and loved quilting but I had no idea how much there is out there. It's like discovering a new world.
The Sew Unique Booth.
Lovely Sue spending time with a customer at our booth. 
First, let me say there were so many beautiful, lovely quilts, that I'll never be able to express it. Second, I love art, and I love artisans (meaning the making of old fashioned things like soaps, cheese, and wood working) quilts might be the most perfect bridge of those two things. While they serve the most basic of needs (staying warm) they are so artistic and beautiful. To those of you who quilt I doff my hat to you! It's so detailed and intense I don't know if I'll ever be up for that kind of massive commitment but oh how beautiful they are.
I love love love that Michigan quilt! The colors in the pink and green quilt are perfect
along with tea, being one of my perfect things. Mix and match strips (from the shop).
Halloween fat quarters (from the shop).
Beautiful award winning quilts.
I went with some friends, and I met some people there. Everyone was so nice and lovely. I visited with an older woman who was telling me she was at a quilt show they awarded Best of Show to the first person who had used a machine to do the actual quilting. She said there was nearly a riot! While I'm sure things have changed somewhat, it's still a serious business and I was so happy to be in the midst of it all. And, who knows, maybe sometime I'll join the ranks of those who can call themselves quilters. 
The photographers; Me and my young apprentice. Start em' young I always say.
P.S. I love those yo-yos

Quilting friends, make quilting all the more delightful!
If your inspired to start a quilt come into the shop where there is lots of expertise and even more fabrics. Or you can check out the website to order online.

Friday, September 6, 2013

Just a Quick Hello!


Just a quick hello from the shop! I wanted to be sure and pop by with the what's what of this week.

I'm excited because Saturday I get to go to my first quilt show! It's not Sue's or Sew Unique's first, of course, but it's the first one for little ol' me, and I'm really looking forward to seeing all the quilts and fabric and finding out what it's all about. I assume it's like comic-con for the quilter!! Sew Unique has a booth at this shindig where we'll be selling all of our amazing fabrics in all kinds of fat quarters and charm packs and jelly rolls... I could go on and on. When I was last in the store there was a table set up in the middle of the shop where everyone was cutting away strips and bundles just to get ready! If your local I hope we'll see you there.
A Quilter's Harvest 2013 QUILT SHOW
Sponsored by Cal-Co Quilter's Guild

Saturday, September 7, 2013
9:00 a.m. to 5:00 p.m.
Sunday, September 8, 2013
10 a.m. to 4 p.m.

Marshall Activity Center
15325 West Michigan Avenue
(West of I-69, north side of W. Michigan Ave.)
Marshall, Michigan

Admission:  $6.00

Just a couple of costumes and fall inspirations on our Pinterest Boards.
We're also getting ready for Autumn and Halloween. By getting ready, I mean pinning ideas for fall decorations and Halloween costumes like crazy! I love being inspired don't you? Which brings me to a request; if your looking for a specific costume, or ideas in a specific genre leave a comment or face book us and I'll search the interwebs to find things for Pinterest matching your needs. For example if your looking for a skunk costume pattern let me do the work for you and I'll pin what I find to our costume board. Want a pumpkin table runner? Leave a comment and I'll pin as many as I can find to our Autumn board. Are you as in love with Kaffe Fassett fabrics as we are? I have so many fabrics sometimes I run out of ideas! Look no further then our Kaffe board. We've pinned oh so many things. Lots of quilt inspiration but we've also found lots of other inspirational ideas of other ways to use their fabric.
I LOVE the dress!


I hope your feeling as positive about fall as I am. And I hope that your getting into the back-to-school swing of things. There'll be a post showcasing some of the highlights from the quilt show in a few days. Talk soon!


Monday, September 2, 2013

The Baby Bib Tutorial

Welcome to the last day of summer/ beginning of school (cue sniffles and desperate urges to tan). It also seems to be a traditional time for projects. Personally I think it’s a fantastic idea to carve out time for creative pursuits but often that time is competing with last of the summer BBQs and back-to-school shopping. I have the perfect solution; a project that is quick, rewarding, and CUTE.

A baby bib! Now, this is not just any bib, this is the BEST bib. What makes it so special? It's is reversible, covers a lot more then a regular bib and is really adorable. When your baby is drooling like mad they can still be cute as a button and dry. This is the perfect project to whip up for that shower or new baby gift, or even if you’ve just discovered you have a messy eater. I received one of these as a gift years ago and since I've never seen them in a store I thought why not just make a tutorial. Also Please note we are not professional pattern makers so follow along as best you can.


What You’ll Need:
Two coordinating Fat quarters (The birds are from my stash and the flowers are from the shop)
One package of Double Fold Bias Tape
Sewing machine and thread
Bib pattern Click Here and print. *The original pattern I used is no longer available. Me and my sweet friend Danielle have done our best to recreate the pattern piece. Print and tape together. Let me know if there are any problems. You'll notice I traced and cut my pieces on the fold. If you wish to do that just fold the pattern in half. 
Make sure your fabric is washed and dried (this is for a baby and will be getting a lot of use)

Step 1:
Trace the pattern on the fold of both fat quarters

Step 2:
Cut the bias tape into two 10inch pieces one 34inch piece and one 32inch piece

Step 3:
Open up both pattern pieces and put them together wrong sides facing.

Step 4:
Take one 10inch piece and sandwich and pin the edge of the armhole fabric between the bias tape. Do the same on the other side and stitch close to the edge being careful not to let the fabric slip out from the bias tape.


Step 5:
Take the 32 inch piece of bias tape and fold it in half to find the middle. pin this to the middle of the bib. Take one end of the bias tape and pin it the end of the shoulder. Do the same at the other shoulder. Pin all the way around. Start at one shoulder and stitch all the way around to the other shoulder.


(your almost done)

Step 6:
Finally fold the 34 inch piece of tape to find the center. Pin this to the center of the neckline and then pin up the rest of the neck. Start sewing at one end of the strap and sew all the way down, around the neckline, and up the other strap. Knot each end and voila you’ve got the cutest little baby bib!