A Modern Sewing Blog.

Showing posts with label tutorial. Show all posts

Saturday, April 11, 2015

Sew a Skirt Tutorial

Here at Sew Unique we love sharing our love of sewing. One of the things I (Jessie) enjoy is a quick garment pattern. Following is a free pattern and tutorial for a skirt. This is a great beginners project and it’s also very quick. Please keep in mind that we are not professional pattern developers or writers. If you have any questions feel free to contact us and we’ll do our best to help you out.


What you will need for an average adult woman: 1 Yard of Fabric
1 Package of 2’’ wide elastic
Spool of coordinating thread
Sewing machine

LET'S GET STARTED!
1. Measure the amount of elastic you will need by wrapping it around your waist (or the waist you are sewing for) and cut.
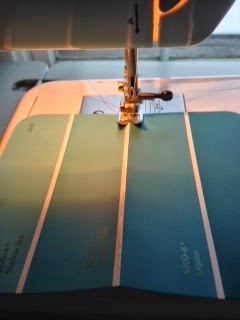
2. Cut your fabric down the center being careful to do it so that the pattern on the fabric is going the right direction (I’ve cut the fabric for one skirt the long ways and one skirt the short way, both work one will simply have more gathers.

3.  Now we are going to sew the two pieces together so that we have one long strip of fabric. We will do this by making a french seam. To make a french seam:

    1. On one side pin the short sides of the fabric together wrong sides facing.

    2. Sew 1/4’’ seam.
    3. Trim the seam
    4. Fold the fabric over so that the right sides are now facing. Press (iron).
    5. Sew a 3/8’’ seam. (Your raw edge will now be encased inside the french
seam)

4. On the long edge of the skirt that will end up being the top of the skirt fold over a 1/4’’ and press. Fold it over 1/4’’ again and press. Sew down the length of the fold. The top of your skirt now has no raw edges.
5. On your sewing machine select a wide basting stitch (probably a three or four). Just below the folded top of your skirt sew across your skirt. Leave a long thread tail at the beginning and end of your row of stitches.

6. Just below the first row of basting stitches sew another row leaving long thread tails. You’ll now have two rows of basting stitches to use to gather your skirt.
7. Now it’s time to gather your skirt. Find the middle of your waist band by folding
the elastic in half. Mark the middle with a pin. Lay the elastic on a flat surface.
8. Lay the fabric below the waistband, with the middle of the fabric lined up with
the middle of the waist band.


9. Starting on one side of the skirt take your threads and begin gathering your skirt by pulling on the threads. Take your time and be careful to spread the gathers evenly. Gather until one half of of your fabric is the same width as that half of the waistband.
10. Repeat step 9 by gathering the other half of your fabric.

11. Pin the gathered fabric to the waistband with right side of the fabric against the wrong side of the waist band. Pin the fabric about half way (or one inch) up on the waistband. Sew along the waistband keeping your presser foot along the bottom edge of the waistband.


12. We are now going to sew up the the side of the skirt. Repeat step three to make a french seam on the side of your fabric sewing from the bottom of the skirt to the top of the waistband.
13. To hem your skirt fold the bottom up 1/4’’ and press then fold it up again 1/4’’ (your can make the fold bigger if you’d like your skirt to be shorter) and
press. Sew along the fold keeping your presser first along the bottom of the skirt. Sew a second line of stitches keeping your presser foot along the first row of stitches.
14. Remove the basting stitches at the waistband.
15. Wear and enjoy!!


Thursday, March 13, 2014

Paint Chip Notebook Tutorial

Today I'm bringing a small, fun tutorial. These are Paint Chip Notebooks. They're really cheap to make, paint chips are free from most hardware stores, one ream of paper will last you forever and a little thread. The idea is based off of Asian book binding specifically Asian Stab binding (only our way is much easier).
Traditional Asian bookbinding, very beautiful but also time consuming.
If your interested click HERE
for more information.

What you'll Need:
Larger Paint Chips (I used the ones from Home Depot they seem to be the biggest and thickest)
10 sheets of nice paper (notebook paper would be to flimsy I used Drawing paper from creatology)
Heavy Duty Needle used for sewing Denim (70/10)
All purpose thread.

Step One: Cut your paper just smaller then the dimensions of the paint chip. If you have access to a paper cutter then all the better.


Step 2: Fold the Paint Chip and the paper down the center. Take your time to really crease the pages.

Step 3: Put your machine on one if it's decorative stitches. I find that this one (H on my machine) works really well with the paper. 

Step 4: Unfold the paper and paint chip and put it all together. Center the crease in the center of your machine. Slowly sew down the flattened notebook being sure to keep everything centered. This part is a little tricky. The paper wants to shift around so just take your time.


Step 5: Refold the notebook and Voila! You have your very own notebook, the prefect size for a small portable sketchbook or notebook for your purse or bag.


Friday, September 27, 2013

How To Alter a T-shirt

How many huge boxy men's or unisex t-shirts do you have stuffed in drawers at home? So many, and some of them are from events and things we'd like promote or remember. Well, never fear the t-shirt tutorial is here! It is so incredibly easy to change the shape and size of a t-shirt, the first time I did it I nearly fainted in front of my mirror in glee, this opens up so many more nerdy shirts for me. I hope these pictures and directions give you the courage and knowledge you need to no longer relegating those 5k and volunteer shirts to your pajama drawer.

What you'll need:
A t-shirt that fits you well (to use as a template)
ball point sewing needle
matching thread
My son is in love with this local restaurant/shop, Station 66, (as am I) and has been bugging us for a t-shirt from there for a while. His birthday is saturday and I wanted to get him one as a gift, but alas their shirts are only in adult sizes. Very basic sewing skills to the rescue! I bought an adult small and am using a shirt of his (size 6) that I know works well.


Step 1:
Turn your huge shirt inside out and lay it on a flat surface being careful to smooth out all the wrinkles and line up all the seams

Step 2:
Take the shirt that fits you well and lay it on top of the t-shirt you want to change. Make sure the shoulders are lined up and everything is smooth (really take your time on this step you don't want to accidentally alter your shirt crooked) Pin through all the layers in a few places to keep it from slipping.


Step 3:
Trace around the sides and up along the bottom of the sleeve of your well fitting shirt. As you trace along the bottom of the sleeve extend your chalk line to the edge of your shirt. If your going to want to hem your new shirt be sure to leave an inch or so beyond the bottom of the well fitting shirt to fold in. Don't trace around the top of your shirt this will be left alone (In other words we won't be altering the original shoulders or necklines).

Step 4:
Carefully remove the well fitting top shirt. Your working with knit fabric here so remember to change you sewing machine needle to a ball point needle. No Sew right along the lines you've marked, straight up the side. Pivoting at the armpit and continuing where you marked the bottom of the sleeve. Do the same thing on the other side.
here you can see the new lines. 


I'm sewing right on the chalk lines
Step 5:
Cut away the access fabric along your new seams (I like to leave about 1/4 to 1/5 inch of fabric. Knit doesn't unravel so don't worry about the raw edges. Cut the sleeve back to your desired length (you can hem the sleeve but I find it's a bit tricky with the knit and since it won't unravel I simply make sure it's a nice clean cut and leave it at that.)

Step 6:
Go back and reinforce the stitching in the underarm.

Step 7:
Cut the shirt to it's desired length. If you want to hem the bottom now's the time. Turn in the raw edge about one inch, iron and sew a new hem. I like to sew two lines of stitching along the hem; the first 1/4 inch from the fold and the second 1/4 inch away from the first row of stitching. I find this gives it a pretty professional look.

Here's the finished Station 66 shirt next to a regular t-shirt of his. I think it looks pretty good. And, usually when your doing this kind of alteration it won't be as extreme of a size shift so it'll look even better.


If you have any questions leave them in the comments. I read every comment we get. So if there is any step that your unsure about ask away. Also don't forget to check out our first "Sewing Room Tour" and we're pinning away like mad on Pinterest.

Now go and take that shapeless sports shirt and give it some girly shape!
Happy Sewing
Love, Jessie.

Monday, September 2, 2013

The Baby Bib Tutorial

Welcome to the last day of summer/ beginning of school (cue sniffles and desperate urges to tan). It also seems to be a traditional time for projects. Personally I think it’s a fantastic idea to carve out time for creative pursuits but often that time is competing with last of the summer BBQs and back-to-school shopping. I have the perfect solution; a project that is quick, rewarding, and CUTE.

A baby bib! Now, this is not just any bib, this is the BEST bib. What makes it so special? It's is reversible, covers a lot more then a regular bib and is really adorable. When your baby is drooling like mad they can still be cute as a button and dry. This is the perfect project to whip up for that shower or new baby gift, or even if you’ve just discovered you have a messy eater. I received one of these as a gift years ago and since I've never seen them in a store I thought why not just make a tutorial. Also Please note we are not professional pattern makers so follow along as best you can.


What You’ll Need:
Two coordinating Fat quarters (The birds are from my stash and the flowers are from the shop)
One package of Double Fold Bias Tape
Sewing machine and thread
Bib pattern Click Here and print. *The original pattern I used is no longer available. Me and my sweet friend Danielle have done our best to recreate the pattern piece. Print and tape together. Let me know if there are any problems. You'll notice I traced and cut my pieces on the fold. If you wish to do that just fold the pattern in half. 
Make sure your fabric is washed and dried (this is for a baby and will be getting a lot of use)

Step 1:
Trace the pattern on the fold of both fat quarters

Step 2:
Cut the bias tape into two 10inch pieces one 34inch piece and one 32inch piece

Step 3:
Open up both pattern pieces and put them together wrong sides facing.

Step 4:
Take one 10inch piece and sandwich and pin the edge of the armhole fabric between the bias tape. Do the same on the other side and stitch close to the edge being careful not to let the fabric slip out from the bias tape.


Step 5:
Take the 32 inch piece of bias tape and fold it in half to find the middle. pin this to the middle of the bib. Take one end of the bias tape and pin it the end of the shoulder. Do the same at the other shoulder. Pin all the way around. Start at one shoulder and stitch all the way around to the other shoulder.


(your almost done)

Step 6:
Finally fold the 34 inch piece of tape to find the center. Pin this to the center of the neckline and then pin up the rest of the neck. Start sewing at one end of the strap and sew all the way down, around the neckline, and up the other strap. Knot each end and voila you’ve got the cutest little baby bib!